Selasa, 31 Januari 2012

How to Let Go and Forgive


We’ve all been hurt by another person at some time or another — we were treated badly, trust was broken, hearts were hurt.
And while this pain is normal, sometimes that pain lingers for too long. We relive the pain over and over, and have a hard time letting go.
This causes problems. It not only causes us to be unhappy, but can strain or ruin relationships, distract us from work and family and other important things, make us reluctant to open up to new things and people. We get trapped in a cycle of anger and hurt, and miss out on the beauty of life as it happens.
We need to learn to let go. We need to be able to forgive, so we can move on and be happy.
Forgiveness can change your life.
Forgiveness does not mean you erase the past, or forget what has happened. It doesn’t even mean the other person will change his behavior — you cannot control that. All it means is that you are letting go of the anger and pain, and moving on to a better place.
It’s not easy. But you can learn to do it.
If you’re holding onto pain, reliving it, and can’t let go and forgive, read on for some things I’ve learned.
1. Commit to letting go. You aren’t going to do it in a second or maybe not even in a day. It can take time to get over something. So commit to changing, because you recognize that the pain is hurting you.
2. Think about the pros and cons. What problems does this pain cause you? Does it affect your relationship with this person? With others? Does it affect work or family? Does it stop you from pursuing your dreams, or becoming a better person? Does it cause you unhappiness? Think of all these problems, and realize you need to change. Then think of the benefits of forgiveness — how it will make you happier, free you from the past and the pain, improve things with your relationships and life in general.
3. Realize you have a choice. You cannot control the actions of others, and shouldn’t try. But you can control not only your actions, but your thoughts. You can stop reliving the hurt, and can choose to move on. You have this power. You just need to learn how to exercise it.
4. Empathize. Try this: put yourself in that person’s shoes. Try to understand why the person did what he did. Start from the assumption that the person isn’t a bad person, but just did something wrong. What could he have been thinking, what could have happened to him in the past to make him do what he did? What could he have felt as he did it, and what did he feel afterward? How does he feel now? You aren’t saying what he did is right, but are instead trying to understand and empathize.
5. Understand your responsibility. Try to figure out how you could have been partially responsible for what happened. What could you have done to prevent it, and how can you prevent it from happening next time? This isn’t to say you’re taking all the blame, or taking responsibility away from the other person, but to realize that we are not victims but participants in life.
6. Focus on the present. Now that you’ve reflected on the past, realize that the past is over. It isn’t happening anymore, except in your mind. And that causes problems — unhappiness and stress. Instead, bring your focus back to the present moment. What are you doing now? What joy can you find in what is happening right now? Find the joy in life now, as it happens, and stop reliving the past. Btw, you will inevitably start thinking about the past, but just acknowledge that, and gently bring yourself back to the present moment.
7. Allow peace to enter your life. As you focus on the present, try focusing on your breathing. Imagine each breath going out is the pain and the past, being released from your body and mind. And imagine each breath coming in is peace, entering you and filling you up. Release the pain and the past. Let peace enter your life. And go forward, thinking no longer of the past, but of peace and the present.
8. Feel compassion. Finally, forgive the person and realize that in forgiveness, you are allowing yourself to be happy and move on. Feel empathy for the person and wish happiness on them. Let love for them, and life in general, grow in your heart. It may take time, but if you’re stuck on this point, repeat some of the ones above until you can get here.

Negara Terkaya di Dunia yang Luput dari Perhatian


Banyak sebenarnya yang tidak tahu dimanakah negara terkaya di planet bumi ini, ada yang mengatakan Amerika, ada juga yang mengatakan negera-negara di timur tengah. tidak salah sebenarnya, contohnya amerika. negara super power itu memiliki tingkat kemajuan teknologi yang hanya bisa disaingi segelintir negara, contoh lain lagi adalah negara-negara di timur tengah. rata-rata negara yang tertutup gurun pasir dan cuaca yang menyengat itu mengandung jutaan barrel minyak yang siap untuk diolah. tapi itu semua belum cukup untuk menyamai negara yang satu ini. bahkan Amerika, Negara-negara timur tengah serta Uni Eropa-pun tak mampu menyamainya.

dan inilah negara terkaya di planet bumi yang luput dari perhatian warga bumi lainya. warga negara ini pastilah bangga jika mereka tahu. tapi sayangnya mereka tidak sadar "berdiri di atas berlian" langsung saja kita lihat profil negaranya.


Negara Terkaya


Wooww... Apa yang terjadi? apakah penulis (saya) salah? tapi dengan tegas saya nyatakan bahwa negara itulah sebagai negara terkaya di dunia. tapi bukankah negara itu sedang dalam kondisi terpuruk? hutang dimana-mana, kemiskinan, korupsi yang meraja lela, kondisi moral bangsa yang kian menurun serta masalah-masalah lain yang sedang menyelimuti negara itu.

baiklah mari kita urai semuanya satu persatu sehingga kita bisa melihat kekayaan negara ini sesungguhnya.

1. Negara ini punya pertambangan emas terbesar dengan kualitas emas terbaik di dunia. namanya PT Freeport.


Apa saja kandungan yang di tambang di Freeport? ketika pertambangan ini dibuka hingga sekarang, pertambangan ini telah mengasilkan 7,3 JUTA ons tembaga dan 724,7 JUTA ons emas.  yang mau bantu saya menghitung nilai tersebut saya persilahkan! hitunglah sendiri dan anda akan tercengang dengan nilainya

(Tentang angka di atas, masih ada aja yang belum percaya... ckckckc. buka mata anda! kita sedang dirampok saudara-saudara! ini website resmi PT. freeport. silahkan anda lihat disana. http://www.ptfi.com/  dari pada saya harus menjawab satu persatu komentar yang tidak percaya dengan angka itu. mereka membeberkanya secara detail, atau mungkin nilai yang kecil dari kenyataanya!)

lalu siapa yang mengelola pertambangan ini? bukan negara ini tapi AMERIKA! prosentasenya adalah 1% untuk negara pemilik tanah dan 99% untuk amerika sebagai negara yang memiliki teknologi untuk melakukan pertambangan disana.

bahkan ketika emas dan tembaga disana mulai menipis ternyata dibawah lapisan emas dan tembaga tepatnya di kedalaman 400 meter ditemukan kandungan mineral yang harganya 100 kali lebih mahal dari pada emas, ya.. dialah URANIUM! bahan baku pembuatan bahan bakar nuklir itu ditemukan disana. belum jelas jumlah kandungan uranium yang ditemukan disana, tapi kabar terakhir yang beredar menurut para ahli kandungan uranium disana cukup untuk membuat pembangkit listrik Nuklir dengan tenaga yang dapat menerangi seluruh bumi hanya dengan kandungan uranium disana. Freeport banyak berjasa bagi segelintir pejabat negeri ini, para jenderal dan juga para politisi nakal, yang bisa menikmati hidup dengan bergelimang harta dengan memiskinkan bangsa ini.

2. Negara ini punya cadangan gas alam TERBESAR DI DUNIA! tepatnya di Blok Natuna.


Berapa kandungan gas di blok natuna? Blok Natuna D Alpha memiliki cadangan gas hingga 202 TRILIUN kaki kubik!! dan masih banyak Blok-Blok penghasil tambang dan minyak seperti Blok Cepu dll. DIKELOLA SIAPA? EXXON MOBIL! dibantu sama Pertamina

3. Negara ini punya Hutan Tropis terbesar di dunia. hutan tropis ini memiliki luas 39.549.447 Hektar, dengan keanekaragaman hayati dan plasmanutfah terlengkap di dunia.


letaknya di pulau sumatra, kalimantan dan sulawesi. sebenarnya jika negara ini menginginkan kiamat sangat mudah saja buat mereka. tebang saja semua pohon di hutan itu maka bumi pasti kiamat. karena bumi ini sangat tergantung sekali dengan hutan tropis ini untuk menjaga keseimbangan iklim karena hutan hujan amazon tak cukup kuat untuk menyeimbangkan iklim bumi. dan sekarang mereka sedikit demi sediki telah mengkancurkanya hanya untuk segelintir orang yang punya uang untuk perkebunan dan lapangan Golf. sungguh sangat ironis sekali.

4. Negara ini punya Luatan terluas di dunia. dikelilingi dua samudra, yaitu Pasific dan Hindia hingga tidak heran memiliki jutaan spesies ikan yang tidak dimiliki negara lain.


Saking kaya-nya laut negara ini sampai-sampai negara lain pun ikut memanen ikan di lautan negara ini.

5. Negara ini punya jumlah penduduk terbesar ke 4 didunia. dengan jumlah penduduk segitu harusnya banyak orang-orang pintar yang telah dihasilkan negara ini, tapi pemerintah menelantarkan mereka-mereka. sebagai sifat manusia yang ingin bertahan hidup tentu saja mereka ingin di hargai. jalan lainya adalah keluar dari negara ini dan memilih membela negara lain yang bisa menganggap mereka dengan nilai yang pantas.


6. Negara ini memiliki tanah yang sangat subur. karena memiliki banyak gunung berapi yang aktif menjadikan tanah di negara ini sangat subur terlebih lagi negara ini dilintasi garis katulistiwa yang banyak terdapat sinar matahari dan hujan.


Jika dibandingkan dengan negara-negara timur tengah yang memiliki minyak yang sangat melimpah negara ini tentu saja jauh lebih kaya. coba kita semua bayangkan karena hasil mineral itu tak bisa diperbaharui dengan cepat. dan ketika seluruh minyak mereka telah habis maka mereka akan menjadi negara yang miskin karena mereka tidak memiliki tanah sesubur negara ini yang bisa ditanami apapun juga. bahkan tongkat kayu dan batu jadi tanaman.

7. Negara ini punya pemandangan yang sangat eksotis dan lagi-lagi tak ada negara yang bisa menyamainya. dari puncak gunung hingga ke dasar laut bisa kita temui di negara ini.


Negara ini sangat amat kaya sekali, tak ada bangsa atau negara lain sekaya INDONESIA! tapi apa yang terjadi?


untuk EXXON MOBIL OIL, FREEPORT, SHELL, PETRONAS dan semua PEJABAT NEGARA yang menjual kekayaan Bangsa untuk keuntungan negara asing, diucapkan TERIMA KASIH.

Dan untuk rasa terima kasih untuk Kemerdekaan Indonesia yang ke 66 tahun, kami pemuda-pemudi Indonesia memberikan penghargaan sebesar-besarnya kepada pejuang yang telah mengorbankan darah dan air mata mereka untuk bangsa yang tidak tahu terima kasih ini.


"Indonesia tanah air beta
disana tempat lahir beta,
dibuai dibesarkan bunda,
Tempat berlindung di hari Tua...
HIngga nanti menutup mata"


MERDEKA....!!!!!


Rabu, 11 Januari 2012

Cara membuat/meracik Henna Pasta (Adonan henna)

Henna Paste itu adalah bahan yang diperlukan untuk melakukan mehndi. Untuk mendapatkan hasil yang terbaik, sebaiknya sering2 lah mencoba dan bereksperimen. karena sedikit kesalahan akan mengakibatkan henna tidak terpakai. Buka link ini untuk melihat kesalahan-kesalahan yang biasa terjadi

Untuk Bahan dasar yang simpel, silakan perhatikan gambar berikut :

Sebenarnya cara membuat henna paste tidak ada aturan bakunya. Seperti membuat kue, setiap chef memiliki resep tersendiri, begitu juga dengan membuat henna paste. Bahan-bahan pendukung untuk membuatnya pun bisa berbeda-beda tiap artist. Ada yang mencampurnya dengan air teh, asam, minyak kayu putih murni, rempah-rempah, seperti kayu manis dan cengkeh. 

Tape or Seal Henna Paste


20-30 minutes after the paste is applied the henna will lose its shine and be dry to the touch. Treat the area gently as the paste is fragile and has a tendency to flake off.
You have several options of how to treat the henna as it dries; bandage with medical tape, wrap with tissue and a layer of plastic wrap, or apply a coat of lemon and sugar to seal the paste to the skin.

Tape Henna paste after the design is applied for PERFECT STAINS

The wraps keep the area warm and creates slight perspiration on the skin to re-moisten the paste. Remember to keep the body warm by sitting near a fire or holding a heating pad to the area, heat makes a better stain.
This is the absolute best way to protect your design and keep small details in place perfectly while the dye soaks in over the next 6-8 hours. You must use medical paper tape as it is porous and allows air to circulate to the the paste allowing for the best results. This type of tape is hypo-allergenic and has a low tack so there is no pain when removing the wraps later.
tape henna paste
When the henna paste is dry to the touch and has lost its shine, carefully wrap the area with overlapping strips of medical tape in 2-3 inch pieces.
Press the tape directly over the henna paste. As long as the paste has had a chance to dry there is no risk of smearing or smudging your design. The tape will hold the henna precisely in place and prevent staining of carpet, bedding and clothing.
The tape holds every bit of paste precisely in place and is very sturdy, you can even put shoes or clothing on over the tape and go about your day without smearing or ruining the design. Remove after 6-12 hours, or overnight.
seal henna pasteIf desired, slide a sock or nylon over the tape to hold everything together and prevent the edges from peeling back or getting caught on clothing or bedding.
henna and tapeAfter 6-8 hours remove the tape. Most of the paste will come off with the tape. Any remaining bits of paste may be removed by rubbing a bit of lemon juice or vegetable oil on the area. Avoid water for the first 24 hours for the best stain possible.

    Lemon and Sugar Sealant is perfect for bendy or soft parts of the body such as stomachs, backs, shoulders, and upper arms.

    To prevent the paste from drying out and flaking off too early use our easy Henna Caravan Citrus Sealant or mix 1 teaspoon sugar with 3 teaspoons lemon juice. Gently dab a bit of this solution on the design once or twice using a q-tip or cotton ball. This lemon sugar mixture will create a protective 'glue' between your skin and the henna. Be careful not to over saturate the paste as designs can run and bleed together. Apply juice 2-3 times. Flake off after 6-12 hours, or overnight.
  • Tissue and Plastic Wrap for hands, wrists, arms, feet, and legs

  • Carefully wrap the dry paste with a piece of tissue and secure it firmly with a piece of tape. Wrap the tissue with one layer of plastic wrap or slide a sock on over the tissue to hold everything together. Remove after 6-12 hours, or overnight
Leave the paste on your skin for as long as possible. We recommend 6-12 hours. The longer the henna paste is in contact with your body the more dye is able to saturate into the skin resulting in a deeper and longer lasting color.

Membuat Henna menjadi lebih gelap dan tahan lama

Mengaplikasikan henna yang sama dan bahan yang sama, terkadang bisa juga berbeda hasilnya antara satu dengan yang lainnya. ada beberapa hal yang mempengaruhi, yaitu :
  1. panas tubuh seseorang.
  2. jenis kulit
  3. musim. musim dingin akan mempengaruhi desain lebih cepat memudar daripada musim panas
  4. waktu pemasangan. semakin lama henna menempel di kulit maka semakin gelap warna yang akan dihasilkan
Ada beberapa tips yang bisa dijadikan pegangan untuk membuat desain henna menjadi lebih gelap dan tahan lama.
  1. campurkan lemon juice (jeruk nipis) saat membuat adonan henna, air teh hitam*, essensial oil**.
  2. diamkan selama mungkin (semalaman) henna yang sudah di aplikasikan ke tangan/kaki. sebaiknya tutup tangan/kaki yang sudah diberi henna dengan menggunakan plastik/tissue kamar mandi. Pendiaman cukup dilakukan 6-7 jam.
  3. setelah henna selesai diaplikasikan, berikan campuran larutan lemon juice dan gula pada tangan dengan menggunakan cotton bud/ semprotan
  4. Kebiasaan orang india, memanggang cengkeh dalam wadah besi, kemudian dekatkan desain henna pada asap cengkeh
  5. Menjaga agar desain dalam keadaan hangat.
  6. jangan menghapus henna yang menempel dengan air, tapi gunakan seperti tusuk gigi yang tumpul/alat lain yang semacamnya.
  7. Menggosok area yang terdapat henna nya akan mempercepat hilangnya henna yang menempel. 
  8. Hindari penggunaan sabun sesaat setelah henna dilepas
  9. Setelah dilepas, oleskan minyak pada area yang diberi henna. minyak sayur/essense oil/zaitun. Ini fungsinya untuk menghindari desain terkena air langsung. tapi lebih baik pilih zaitun/essense oil karena tidak terlalu lengket
* Penggunaan air teh bisa dilakukan dengan memasak air teh kental sampai berwarna hitam dan mendiamkannya semalaman lalu campurkan esoknya dengan henna bubuk.


** Essensial oil mengandung bahan Hennotannic acid yang merupakan kunci henna memberikan warna  gelap. Esensial oil yang bisa dipakai : tea tree, cajeput, ravensara, clove bud, and lavender. Yang tidak beresiko mengakibatkan iritasi kulit adalah tea tree, cajeput and ravensara. Tapi yang paling bagus adalah cajeput (kayu putih).

Cara Menghapus Henna yang menempel di kulit

Untuk memperlancar desain henna, biasanya kita berlatih di tangan sendiri, tapi sayangnya henna butuh beberapa waktu untuk menghilang, paling cepat 5 hari baru bisa hilang. Dengan sifat henna ini membuat latihan kita tertunda..na ada beberapa cara untuk mempercepat hilangnya henna di kulit, misalnya :

  1. Jangan biarkan terlalu lama henna menempel di kulit. Kalau sudah kering, segera hapus lalu siram dengan air, yang penting kita tau hasil desain setelah henna dilepas.
  2. Henna tidak akan langsung hilang dengan digosok setelah dilepas. jadi gosok kulit setelah henna mulai berwarna coklat (kira2 h+2), dengan menggunakan tangan atau bantuan alat seperti batu apung
  3. cuci henna dengan sabun beberapa kali
dengan perlaukan di atas, insyaAllah dalam waktu 3 hari henna bisa dibersihkan meski tidak bersih sempurna.

semoga tips ini bisa membantu :)

Applying henna with Jacquard or Luer Lock Bottles

jacquard bottle
Claire, a fabulous henna artist, is shown applying fresh henna paste to the hand. Modern squeeze bottles fitted with a stainless steel tip similar to a mechanical pencil tip are very easy to use. They are available in 3 sizes so you have the freedom to work with very small, delicate lines or just twist on a large tip for a bold desing or areas that need filling in. Gentle pressure produces a perfect and consistenly even line of henna with these tips.
They are wonderful for beginners as they require no special skill to use and are also preferred by many professional henna artists as they are quick, easy and reliable. Purchase bottles and stainless steel tips here
dragon fly henna

How to Mix Henna Paste: HC's tried and true "KISS" recipe


Natural Henna

The henna plant is one of the oldest cosmetics ever used and is extremely safe. Natural henna rarely causes any adverse reactions, if you are concerned do a small patch test first and consult your physician. Natural henna is generally safe as it contains no chemical dyes or harsh additives.

Black Henna

There is no such thing as black henna. To produce a black color, chemicals that are unsafe for your skin must be added. Black henna should be avoided! A chemical dye known as PPD, which is prohibited for use on the skin by the FDA is often added to the natural henna to produce a black color. It can cause liver and kidney damage, as well as scarring of the skin. For more information check out http://www.hennapage.com/henna/ppd/index.html.

How to tell if it's Natural Henna Powder?

Fresh henna powder smells like fresh cut hay or spinach and is an earthy green or khaki color. Bright green powder may have chemical dye added, this is often just a food coloring and can be safe. Sometimes the green dye is added to disguise an old crop of powder. If the powder is brown and has little or no scent, it may be stale and too old to yield a good color formehndi or henna body painting.

Henna powder is light and heat sensitive as it is an organic product with no preservatives added. Store henna powder sealed tightly and protected from light, air, and moisture in the freezer.

PART 1 - Begin 24 hours before you plan to use the henna

Begin mixing henna and lemon juice

Begin mixing paste the day before you would like to apply the henna. It takes about 24 hours to prepare the henna paste for application.
1. Gather your Supplies
  • Fresh Henna Powder, 20 grams or 1/4 Cup
  • Bottled or Fresh Lemon Juice, strained
  • Small Plastic or Glass Bowl
  • Measuring Spoons
  • Sugar
  • Essential Oils, 1.5 teaspoons
  • Plastic Sandwich Bag
  • Applicator Bottle or Cone
This recipe is for 20 grams of fresh henna powder and will produce approximately 3 ounces of paste, enough for 75 small patterns, 3-4 cones.
mixing fresh henna paste
2. Pour 20 grams of fresh henna powder into a small bowl
how to mix fresh henna paste
3. Add 1/4 cup of strained fresh or bottled lemon juice.
When using any dye a second ingredient is needed to create the chemical reaction to release the dye molecule. Henna requires an acid to bring out the dye molecule contained within its leaves. Lemon juice is the perfect companion as it is very acidic, readily available, and very safe.
We do not recommended water to mix your paste. Some recipes call for many ingredients such as coffee, tea, water, tamarind, dried limes, cloves, and spices. None of these extra ingredients will make much of a difference in the staining power of your paste. You'll get a fabulous stain with just lemon juice and a great henna powder and high quality essential oils.
henna caravan paste recipe
4. Stir the henna and lemon juice until they are completely mixed together and no lumps of dry powder remain.
henna paste recipe
Stir
henna caravan paste recipe
Stir
henna paste recipe
The paste will be thick, similar to mashed potatoes.
 
essential oils for dark henna stains

Part 2

Add Sugar and Essential Oil

1. add 1.5 teaspoons sugar. (If you are using Henna Caravan 20 grams henna powder with sucrose the sugar has been added to your henna for you)
Sugar helps the paste stick to the skin by drawing moisture into the paste and prevents cracking and drying out of the paste. It also makes a silky smooth and creamy paste.
Add the vial of Henna Caravan Essential Oils ( 1.5 teaspoons)
Cajeput, tea tree, revensara, or lavender are all good choices. Mix the ingredients thoroughly. The essential oils will help to produce the deepest and darkest stain possible.
Never use Clove, Mustard or Mehendi Oil as they can be harmful
henna for dark stains
2. Stir. Iit will be lumpy and chunky at first.
dark henna stains begin with fresh henna
Keep stirring
thin henna paste is easy to draw withIt will smooth out and become silky
henna paste recipe
3. Cover the paste with plastic wrap. Press the plastic wrap against the surface of the paste expelling any air pockets.
making henna paste
4. Let the paste sit in a warm place, around 75 ° to 85° Fahrenheit, for 24 hours to allow the dye to be drawn out of the henna leaves so it will stain your skin deeply and as strong as possible.
henna paste dye release
You are waiting for the dye to be released from the henna leaves. If you mix henna in a clear container it's easy to see the dye release. This is an easy way to insure your henna is fresh and has good dye content.
The dark band at the top shows where the dye has released.
5. After letting the henna mature for 24 hours it is ready to be used. Check and adjust your consistency if desired.
fresh henna paste
Determining exact amounts of lemon juice required for henna paste is very difficult since the henna plants are grown in many different regions of the world. Depending on the location, weather, and time of year the leaves are harvested the recipe will need varying amounts of lemon juice. The paste should be smooth and creamy, similar to yogurt. If too much lemon juice is added the paste will be runny and your designs will bleed together. If the paste is too thick it will be difficult to squeeze the paste out of the applicator.

Add lemon juice 1/4 teaspoon at a time, mixing completely between each addition, until you reach the desired creamy consistency.

When your paste is the perfect consistency fill your applicators.

How to apply Two Tone Henna Patterns


2 tone detail
After seven years working with henna, I grew dissatisfied with the single dimension of traditional henna application. I wanted to expand the tone and color available in my patterns to create a greater variety and elegance for my clients.
I developed a simple method of applying two-toned henna to fulfill my desire for a richer and more painterly henna technique.This method requires only a little extra time and forethought but no extra materials. Two-Toned henna patterns are applied in 2 or 3 steps. The major design elements should be planned out before you begin to apply the henna.
When considering the pattern to be used, designs with many 'closed' elements lend themselves particularly well to two-toned henna. Look for patterns which have variation in width of line for added depth and elegance. The variation in line width will break the image up and can be used to draw attention to one element or another.
how to 2 tone henna
We prefer letting the henna set on the skin overnight, however 6-8 hours is sufficient. For continuity, we will only suggest overnight.
1. Apply the outline of the entire pattern.Wrap the paste in medical tape or seal with lemonade and let sit on skin overnight.
first layer 2 tone henna
2. In the morning remove the wraps and the first application of paste.
second layer henna
3. Apply henna to the elements you wish to give added depth, interest, variety, and color.
Consider the balance of the entire design carefully. You want to create a balance of light and dark areas. Be conscious of the weight of each line and do not allow the fine details to be overwhelmed or disguised by the medium tone of henna you are now adding. Allow the second application of henna to remain on the skin for 3-10 minutes, depending on the quality of henna and the tone you desire.
henna removed
4. Remove the second application of henna.
A little lemon juice will remove all traces of paste leaving clean and crisp lines. Do not use water to remove the paste, as it will interfere with the dye quality.
henna darkening
5. 24 hours after all henna paste has been removed.
The stain will continue to deepen and darken over the next 48 hours.
dark henna
6. 48 hours after the paste has been removed. The stain will have gradually deepened to a richer red-brown tone.
The stains fade away naturally within 1-3 weeks. Enjoy your elegant new henna.

Kesalahan yang biasa terjadi saat Membuat henna pasta

Kesalahan merupakan pengalaman yang baik untuk mendapatkan hasil yang maksimal. Sebagai newbie dalam per- henna-an, saya yakin banyak yang sekali menemui ketidak berhasilan. Biasanya kesalahannya sebagai berikut :

1. Warna tidak keluar

Biasanya ini terjadi karena gula dicampur bersamaan dengan air jeruk nipis saat membuat adonan. Sebaiknya campurkan jeruk nipis dulu, diamkan sampai 8-12 jam baru masukkan gula lalu diamkan lagi 8-12 jam.

2. Adonan yang keluar dari cone ada cairannya

Adonan yang dibuat jika keluar cairan berarti adonan tersebut kebanyakan cairan (jeruk nipis/air teh)Jika hal ini terjadi berarti kemungkinan untuk meng-henna jadi susah. kalau ditambahkan henna bubuk pun warnanya justru menjadi tidak keluar. daripada henna yang dibuat terbuang, sebaiknya digunakan untuk rambut :)

3. Adonan yang keluar terdapat gumpalannya, mengakibatkan henna tidak lancar keluar


Kesalahan ini biasanya disebabkan karena hal yang sama seperti kesalahan pada nomor 2. Adonan kelebihan cairan. Memang sepertinya adonan sudah dibuat kental, tapi terkadang adonan sedikit mencair ketika didiamkan. Jadi antisipasinya di kemudian hari tambahkan takaran henna bubuk saat membuat adonan. Tapi bisa juga karena henna nya belum tersaring sempurna (unfiltered), atau proses mengaduk adonannya kurang lama.

3. Adonan susah keluar.

Ini terjadi jika adonan yang dibuat terlalu kental.

4. Adonan terputus putus saat digunakan untuk mendesain.

Henna pasta jika terputus putus akan mengganggu saat proses desain, jadi jangan lupa tambahkan dextrose (gula/madu) saat membuat adonan, atau tambahkan lagi takaran gula pada adonan di kemudian hari.

Selasa, 10 Januari 2012

Cara Membuat Antena Modem Flash CDMA GSM 3G Sistem Induksi.

Ada beberapa cara menguatkan Sinyal Modem baik CDMA GSM GPRS 3G dan Wireless LAN salah satunya adalah dengan menggunakan Teknik USB Extender dan Antena Luar. Jika anda ingin online tapi terlalu jauh dari Hot Spot, jaringan kabel dan bahkan jaringan GPRS, maka cara ini perlu dipertimbangkan. Pasang antena wireless untuk menguatkan sinyal gprs atau cdma anda.

Berikut bahan-bahan yang dibutuhkan untuk membuat Antena Yagi CDMA 800-MHz Sistem Induksi :

  • Batang alumunium persegi ukuran 1-cm x 2-cm panjang sekitar 100-cm berfungsi sebagai Boom
  • Kawat kuningan diameter 2,5-mm secukupnya. Berfungsi sebagai elemen antena Yagi. Kawat ini biasa digunakan untuk bahan Las dan Anda dapat membelinya di toko-besi
  • Kotak sambungan kabel Telepon. Kotak ini berfungsi sebagai tempat Driven dan penyambungan Kabel Coaxial
  • Manik-manik Isolator Transistor berfungsi untuk mengisolasi/memisahkan
  • antara kawat elemen dan Boom Alumunium supaya tidak ada hubungan secara mekanik dan elektrik
  • Kabel Coaxial 50-ohm atau 75-ohm sepanjang 10-m s/d 15-m
  • Kawat Email penampang 1-mm secukupnya. Kawat ini digunakan untuk membuat Kumparan Induksi Sinyal bagi Modem CDMA atau GSM
  • Klem Antena untuk menggabungkan antena dengan tiang penyangga
  • Isolasi secukupnya
  • Lem Bakar secukupnya
  • Lem G atau Alteco secukupnya

Nah untuk langkah-langkah cara pembuatannya saya kira tidak usah saya jelaskan. Yang jelas untuk membuat Antena Yagi CDMA 800-MHz Anda membutuhkan peralatan berupa Bor, Solder, Gergaji Besi, Tang Potong dan peralatan penunjang lainnya.
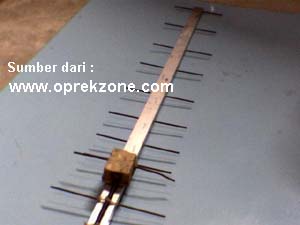
Berikut Dokumentasi Antena Yagi Modem CDMA 800-MHz Sistem Induksi yang saya buat :
Ini Antenanya :
Ini Kumparan Induksinya :
Pembuatan Kumparan Induksi disesuaikan dengan Ukuran/Bentuk Fisik Modem sekitar 4 lilitan.
Pemasangan Kumparan Induksi pada Modem :
Hasil Pengujian :
  • Tanpa Induksi Antena :
  • Setelah dipasang Kumparan Induksi :
Untuk Skema Antena Lengkap beserta gambar, ukuran dan cara pembuatannya sengaja saya berikan 2 ukuran untuk CDMA frekuensi 800-MHz dan CDMA frekuensi 1900-MHz. Bisa di Download :


Untuk Skema Antena Lengkap beserta gambar, ukuran dan cara pembuatannya sengaja saya berikan 2 ukuran untuk CDMA frekuensi 800-MHz dan CDMA frekuensi 1900-MHz. Bisa di Download :

Skema Antena Yagi CDMA 3G 800 MHz dan 1900 MHz Sistem Induksi
Terdapat perbedaan sangat signifikan dimana saat Modem CDMA 800-MHz tanpa antena (di dalam kamar) sinyal menunjukkan NOL Bar dan saat dipasang kumparan induksi Sinyal Modem CDMA terjadi penguatan 100 % menjadi 5 Bar atau Full Bar dan sangat lancar digunakan untuk koneksi Internet CDMA. Saat itu Antena Yagi CDMA 800-MHz Sistem Induksi tersebut saya letakkan diluar rumah dengan ketinggian hanya 4,5-meter dari atas tanah dan tepat mengarah ke BTS Provider CDMA-nya yang berjarak sekitar 6-km.
Semoga artikel  Cara Membuat Antena Modem Yagi CDMA / GSM / 3G dapat berguna bagi kamu.